
Frames V1: Quickstart Farcaster Frames 101
Ship Frames as fast as possible!
For simple taste of Samuel we will use Coinbase Onchainkit through out this sample. Though many other Frame Development Kits exist and can be found here

Quickstart your Setup
Getting setup is as simple as running the command below. Simply copy & paste into your terminal.
git clone https://github.com/Zizzamia/a-frame-in-100-lines.git shippingFrame && cd shippingFrame && npm installWe are cloning the starter/example for onchainkit and getting the dependencies installed so we’re good to go.
Look at your first frame
The example already ships a frame! You made it!
Thats your first frame.
by running npm run dev in your terminal you now serve that frame, though we don’t have a way to look at it.
Yes you could host this anywhere as it’s NextJS but we want to see it locally to debug right?
Setup your debugger
For debuggers once you have deployed to production or an online dev instance there is the Warpcast inspector which you should look at if your Frame works since its the largest Farcaster client so most of your users will use that!
Locally frog.fm has a nice debugger and frames.js also has one.
We’ll use Frames.js though either one works because we simply paste our frame Url in there and it simply uses that.
Therefore we could also build Frames with other tools and aren’t limited to NextJS like Expo React Native API Routes or others find an overview of Frame Samples + Dev Kits here if interested.
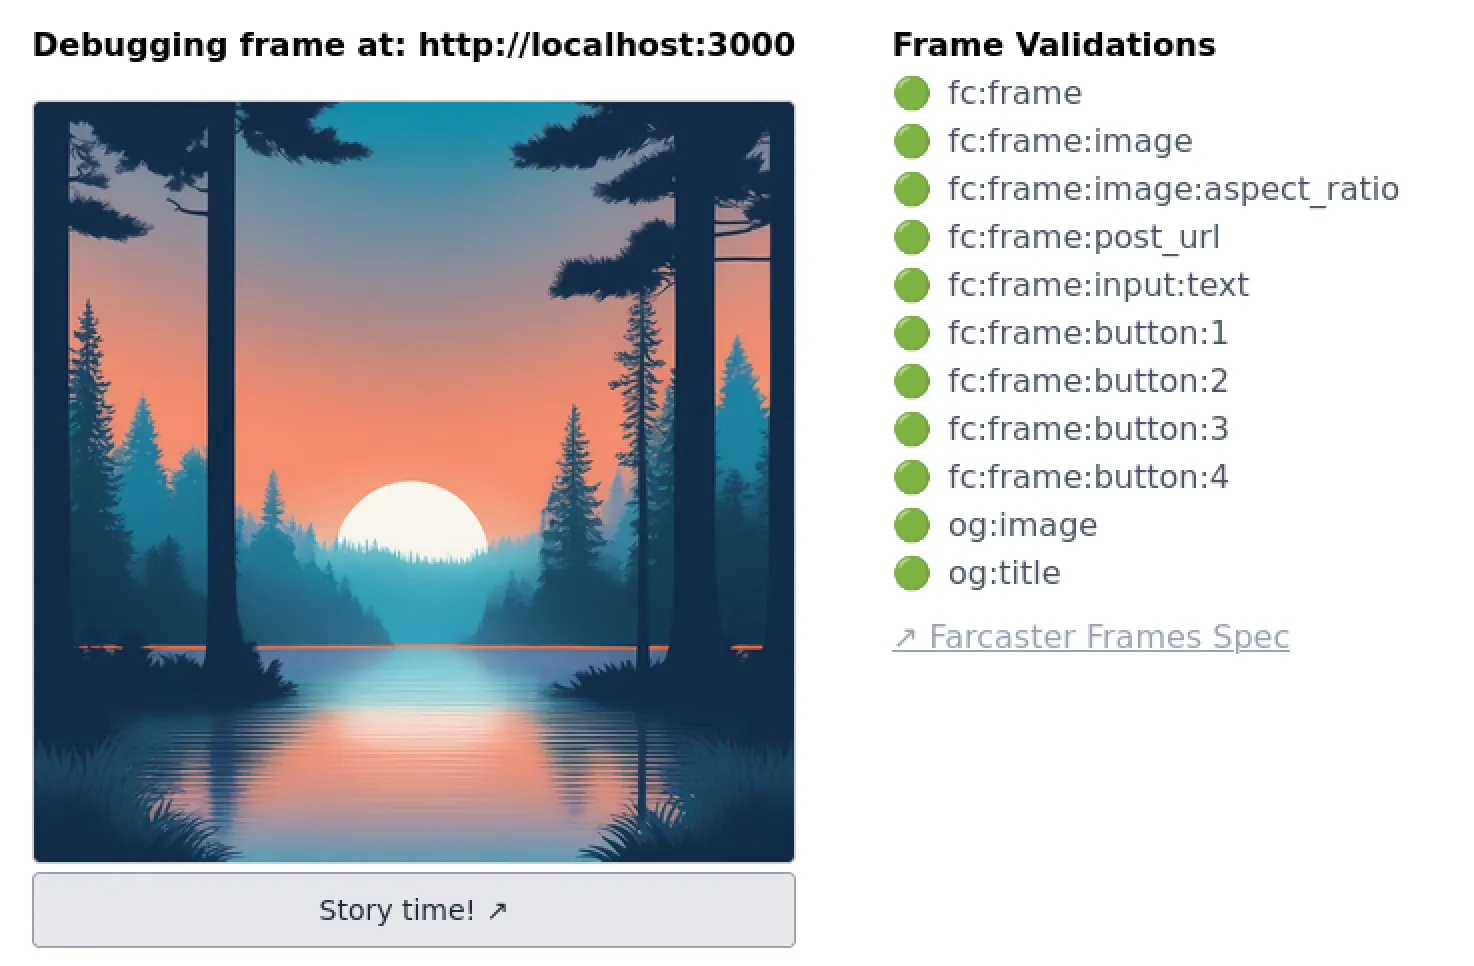
To spinup your debugger with frames.js run the following command in the terminal like we did the Quickstart Setup
npx framesYou are now running the FramesJS debugger. In case that doesn’t work for you check the framesjs debugging guide.
There in the browser we’ll be able to see what our frame looks like so again make sure in the frames folder we setup in Quickstart Setup run npm run dev or make sure it is still running.
Now use that url (likely http://localhost:3000 if still running) and paste it into the debugger.
Meaning in your browser go you http://localhost:3010/ and enter the URL of the Quickstart Frame we put up.
You should now see your Frame.
What we will be building today will be a calculator! Have a look below!

Shipping custom Frames
Now that we have our setup ready and a working debugger we can ship a custom frame.
In your frames working directory (shippingFrame if you didn’t change it) open app/page.tsx.
You will be greeted by something similar to the below
app/page.tsx
const frameMetadata = getFrameMetadata({...});Where the getFrameMetadata is simply a helper function that returns the html metadata tags needed for Farcaster clients to render your Frame.
Have a look at the architecture of Frames if you want to learn the specifics.
Though all you need to know is that here is where we define our initial Frame. The first Frame the user will see when we send him our URL!
Remove all buttons and for now just make it one button that links to our webpage https://dtech.vision
so we strip everything in the getFrameMetadata and just leave the image in there and one button
const frameMetadata = getFrameMetadata({ buttons: [ { label: 'Story time!', }, ], image: { src: `${NEXT_PUBLIC_URL}/park-3.png`, aspectRatio: '1:1', },});Now when we check our Frame in the debugger it will do nothing. So we need to add a link action that tells the Client that our button should redirect!
Let’s do it:
buttons: [ { label: 'Story time!', action: `link`, }, ],though that doesn’t work since link requires us to give it a target
hint: mint action is the same, the others default to the postUrl if no target is specified, but we’ll get to that
let’s add a target so the clients know which link they should have the user open when pressing our button
const frameMetadata = getFrameMetadata({ buttons: [ { label: 'Story time!', action: `link`, target: 'https://dtech.vision', }, ], image: { src: `${NEXT_PUBLIC_URL}/park-3.png`, aspectRatio: '1:1', },});Now when we test it in the debugger we will see our link and it will open our webpage!
We could deploy this now and just ship a beautiful link preview as farcaster frame.
If thats all you want to do check the launch your frame section now.
Lets actually work with buttons and user input
The fun really begins when we start working with the buttons!
When a user clicks a frame that has a regular button a postRequest is sent to the Server.
Which for us simply means we get data from the client we can handle and work with!
This is also how we return a new updated Frame aka have our Frame Application have multiple steps / multiple Screens!
Now you can start to understand how you can build complex applications and user interfaces all in frames!
If four buttons is all you need you’re golden! if you need more you can use 3 and have the fourth one be a menu button ;) to cycle buttons
Though let’s get started building a simple calculator!
We will get user input and have the user tell us if it should be added up or substracted.
To get there we will adjust the getFrameMetadata again! You’ll see this becomes a pattern.
This is also why I personally like the onchainkit way of building frames as I can just use the getFrameMetadata or getFrameHTMLResponse everywhere! It’s a Typescript function so as long as I have that it works (ps: also works in Expo if you’re building native apps)
Okay so what exactly do we want now?
- input
- add button
- subtract button
so lets do the thing we already know and add to buttons!
Since we want to send the data to our server again (recieve the Post Request) we can leave the button’s empty besides their label!
const frameMetadata = getFrameMetadata({ buttons: [ { label: '+', }, { label: '-', }, ], image: { src: `${NEXT_PUBLIC_URL}/park-3.png`, aspectRatio: '1:1', },});Nice so we can now press + or - in our little calculator. But we can’t input what to add or substract so let’s add that.
We just adjust the Frame with input by adding an input:
const frameMetadata = getFrameMetadata({ buttons: [ { label: '+', }, { label: '-', }, ], input: { text: 'Input your number', }, image: { src: `${NEXT_PUBLIC_URL}/park-3.png`, aspectRatio: '1:1', },});
Now we can get user input! Test it in the debugger, you can see that you can press two buttons and enter text, though we can’t see our result after…
Nothing happens. This is because we don’t tell the Frame where to send our data and we don’t handle it.
To do so we open the app/api/frame/route.ts file that exposes the following post endpoint for us: /api/frame/
in there we will now build out the response frame! This will control the flow of our application! We will build it out in a second.
Though first we tell the initial frame to send it’s data there!
To do so we add the post_url field that we deleted, when we emptied the sample from Coinbase.
Now our initial Frame looks like:
import { NEXT_PUBLIC_URL } from './config';
const frameMetadata = getFrameMetadata({  buttons: [    {      label: '+',    },    {      label: '-',    },  ],  input: {    text: 'Input your number',  },  image: {    src: `${NEXT_PUBLIC_URL}/park-3.png`,    aspectRatio: '1:1',  },  postUrl: `${NEXT_PUBLIC_URL}/api/frame`,});
as you can see there the NEXT_PUBLIC_URL is used to define if we have localhost or yourdomain.com
This can be a config file like it is in the sample or also easily be an environment variable!
Let’s adjust the app/config.ts to be http://localhost:3000 or whatever port your frame is running on.
You can also adapt config.ts to
export const NEXT_PUBLIC_URL = process.env.NODE_ENV == "development" ? 'http://localhost:3000': 'https://yourprod.com'This way locally you have localhost and may only need to change the port, while prod will have your proper domain always. … or use an env variable.
IMPORTANT: make sure to always have http:// for localhost and https:// for regular domains as otherwise it won’t work!
Now when you test in the debugger you’ll see some fun stuff or not so fun… let’s fix and get our calculator working!
Handle post requests aka build logic into our Frame
To get our calculator fully working we will need to
- know which button was pressed by the user (1: addition, 2: substraction)
- make sure the input is actually a number
- return a new frame within 5 seconds otherwise Farcaster clients will not render the frame and think of it as timed out
To do so we open the app/api/frame/route.ts file that exposes the following post endpoint for us: /api/frame/
There is already some logic in the sample so what does it do? can we use it?
Yes we can actually it already handles user input for us! and it shows how we learn what button was pressed, but starting at the beginning we have the following code that checks if the data we got sent is actually valid.
if (isValid) { accountAddress = message.interactor.verified_accounts[0]; }you need to know that the message.interactor... is part of the API response from Neynar. What’s Neynar? neynar.com provides
Farcaster APIs so we can easily develop with it. We can also use Farcaster Hubs directly, but we’ll stick with the sample and use Neynar!
you’ll see in lines above that you need to input a NEYNAR_API_KEY i’d recommend not doing it here but instead using .env variables!
to get a API Key use neynar.com and create an account. The Read only (cheaper) option is enough for this demo!
Now with that we can verify against a Farcaster Hub (a node in the decentralized Network powering the Social Network) that the client actually sent us something nice!
Now on to get the input from the message! We provide the user the ability to input a number so here is the logic to get the input the client sent.
if (message?.input) { text = message.input; }Though we have an issue with that. Can you spot it?
We need to make sure we get a number and we need to return an error if we don’t get input as we are a calculator that gets input.
We’ll handle errors at the end, so let’s start with making sure it’s a number.
To do that we try the conversion and catch potential errors though we’ll properly handle them later.
now our message logic looks like:
let numberIn: number = 0; if (message?.input) { text = message.input; try{ numberIn = parseInt(text); } catch (e) { console.error(e); } } else { console.error('No input'); }moving on we will want to know if we should add the number or substract. Soooo we’ll check the buttons
and there is some logic that already does
if (message?.button === 3) { return NextResponse.redirect( 'https://www.google.com/search?q=cute+dog+pictures&tbm=isch&source=lnms', { status: 302 }, ); }the above logic actually sends a 302 redirect which is how you properly handle a post_redirect action in a Frame! Nice to know, but not needed for us here.
So we’ll just extend the logic to handle our two button cases and move on!
We have a small thing to take care of first though as we don’t actually store our current result anywhere.
For simplicity we will store one global result so everyone will be using the same calculator :O one calculator for all of farcaster! One ring to rule… okay I’ll stop
If you want to have it be per user you can use a Key Value store, database, excel or whatever that stores a mapping from FID to result. Then just fetch it in that post logic so before the buttons you would do
const fid = message?.interactor.fid; // use neynar return to get the FIDlet result = getResult(fid); // look up the user's resultWe will keep it simple and use global state.
so our result is simply let result = 0; which we put at the beginning of our route.ts file directly after the imports.
Now to handle both buttons of our calculator correctly we get:
if (message?.button === 1) { result += numberIn; } else if (message?.button === 2) { result -= numberIn; } else { console.error('none of our buttons pressed?!') }and yes it is correct that Frame buttons are indexed with 1 and not by 0 like arrays are for example.
Now that we have done our addition we can just return a new calculator Frame that the user can interact with to do more calculations.
Luckily we will save our Kindergarden cousin from homework now ;)
And we already have built such a Frame it’s the first one, remember that? So we can just copy that over in the Frame that is in the sample.
though now we use getFrameHTMLResponse() instead of the getFrameMetadata() function.
we then have
return new NextResponse( getFrameHtmlResponse({ buttons: [ { label: '+', }, { label: '-', }, ], input: { text: 'Input your number', }, image: { src: `${NEXT_PUBLIC_URL}/park-3.png`, aspectRatio: '1:1', }, postUrl: `${NEXT_PUBLIC_URL}/api/frame`, }) );
though a nice refactoring we can do is put that frame in it’s own file
so if we create frameCalculator.ts in our app/ directory we can import from this file and just need to adjust the frame once there!
so create frameCalculator.ts then input:
import { FrameMetadataType } from "@coinbase/onchainkit";import { NEXT_PUBLIC_URL } from "./config";
const frameCalculator: FrameMetadataType = {    buttons: [        {            label: '+',        },        {            label: '-',        },    ],    input: {        text: 'Input your number',    },    image: {        src: `${NEXT_PUBLIC_URL}/park-3.png`,        aspectRatio: '1:1',    },    postUrl: `${NEXT_PUBLIC_URL}/api/frame`,};
export default frameCalculator;
and in app/page.tsx we now use that Frame
//..import frameCalculator from './frameCalculator';
const frameMetadata = getFrameMetadata(frameCalculator);//...
as well as in our app/api/frame/route.ts
//... return new NextResponse( getFrameHtmlResponse(frameCalculator) ); //...that refactoring doesn’t make our Frame any different but I find it cleaner to work with.
And we’ll use the same logic for our Error Frame (Error Screen) as we need that at different points and don’t want to replicate code there.
Handle Errors in Frames. The Error Frame
Now that we have a nice Frame, we want to handle errors properly instead of just returning the old frame potentially.
So we’ll do that.
First we’ll create a new file in the app/ directory called frameError.ts and build a simple one Button Frame saying “Error”
sending the user back to the calculatorFrame.
app/frameError.ts
import { FrameMetadataType } from "@coinbase/onchainkit";import { NEXT_PUBLIC_URL } from "./config";
const frameError: FrameMetadataType = {    buttons: [        {            label: 'Error!',        },    ],    image: {        src: `${NEXT_PUBLIC_URL}/park-1.png`,        aspectRatio: '1:1',    },    postUrl: `${NEXT_PUBLIC_URL}/api/error`,};
export default frameError;
now that we have our Error Frame and told it to use the /api/error/ endpoint let’s create that real quick
so we’ll create the error folder and route.ts file so app/api/error/route.ts and create a quick post request handler
that serves our original frame.
app/api/error/route.ts
import { getFrameHtmlResponse } from '@coinbase/onchainkit/frame';import { NextRequest, NextResponse } from 'next/server';import frameCalculator from '../../frameCalculator';
export async function POST(req: NextRequest): Promise<Response> {  return new NextResponse(    getFrameHtmlResponse(frameCalculator)  );}
export const dynamic = 'force-dynamic';
as you can see here we now have a super simple file that returns our original calculatorFrame because we have refactored it beautifully to it’s extra file and don’t need to rewrite the same code :)
now we want to use the error Frame in our main frames as well.
sooo where we logged error’s before we can simply use the NextResponse to the Error Frame
return new NextResponse( getFrameHtmlResponse(frameError) );so our app/api/frame/route.ts which serves our calculator now becomes
  //...  let numberIn: number = 0;  if (message?.input) {    text = message.input;    try {      numberIn = parseInt(text);    } catch (e) {      console.error(e);      return new NextResponse(        getFrameHtmlResponse(frameError)      );    }  } else {    console.error('No input');  }
  if (message?.button === 1) {    result += numberIn;  } else if (message?.button === 2) {    result -= numberIn;  } else {    console.error('none of our buttons pressed?!')    return new NextResponse(      getFrameHtmlResponse(frameError)    );  }  //...
if you want to make sure you catch all errors you can also wrap the whole getResponse function into a try {...} catch (e) {...}
that way you could serve an error frame if something happens which then on button press lets the user restart.
Dynamically generate Images on the fly to show a calculator display
Okay this will be fancy and really cool! We will generate images on the fly that show the current result of our calculation and return that image!
Whoooot! yes! Lets get to it.
// TODO: use satori to generate an image on the fly that has the current result
Deploy the frame to dev or production
No matter where your Frame is developed all it does is respond to some network requests with some HTML Metatags which means technically your frame could just be some static HTML that has the metatags set and a server that serves it.
Though in our quickstart we have a nice calculator in NextJS so we can use anything that has a NodeJS Server.
with NextJS being developed by Vercel of course you can simply run npx vercel and have it deployed there.
IMPORTANT: You will have your public URL / domain in there as postUrl or somewhere else in the Frame. Make sure it is actually the one where your environment sits! If it’s still localhost or hardcoded your Frame may be broken because of that! You can also adapt config.ts to
export const NEXT_PUBLIC_URL = process.env.NODE_ENV == "development" ? 'http://localhost:3000': 'https://yourprod.com'This way locally you have localhost and may only need to change the port, while prod will have your proper domain always. … or use an env variable. For localhost you always use http:// and for your public domain you use https://
To deploy directly to prod using vercel run npx vercel --prod and annoy the senior devs if something breaks ;)
Make sure to either use environment variables for the NEXT_PUBLIC_URL, set them in vercel and replace the config.ts from our sample or change the URL before deploying.
When entering the url on localhost for testing you need to use
http://localhost...and else you need to usehttps://yourdomain.commake sure this is the case otherwise it will not work!
For our sample calculator that is in the file app/config.ts.
any other solution like netlify, or a simple NodeJS Docker container also works.
Or you have your own server and clone your repo/push your code there. Then you can run npm run start.
You then likely need to expose the port 3000 or whatever NodeJS uses for you under your domain.