
Frames V1: Sign In to NextAuth from Farcaster Frames Button presses with Farcaster AuthKit
This guide assumes you know what Farcaster Frames are, but even if you don’t you can follow the guide to implement one for authentication to your app.
There is an incredible AuthKit available that already did the work for our WebPage to setup NextAuth, Sign In With Farcaster and provides it as a sample. We’ll use this sample to get up and running and add Sign In as well as user creation via Farcaster Frames using the signed message each Frame interaction gives us.
To start simply run the following in your terminal which will set you up with a fresh example.
git clone https://github.com/farcasterxyz/auth-monorepo.git && rm -rf auth-monorepo/.git && mv auth-monorepo/examples/with-next-auth authkit-nextauth && rm -rf auth-monorepo && cd authkit-nextauth && git init . && npm install && npm run devYou can already see the sample webpage in your browser. Go sign in with Warpcast!

Make sure your .env is setup with the correct values for the following
# $ openssl rand -base64 32NEXTAUTH_SECRET='760...'NEXTAUTH_URL='http://localhost:3000'NEYNAR_API_KEY=''You can get a Neynar API Key at the Neynar Webpage. The Next Auth parameters are documented in the NextAuth docs. You won’t need a NEYNAR API Key if you use another API or Hub. For this tutorial we will use Neynar.
Building the actual Frames Authentication
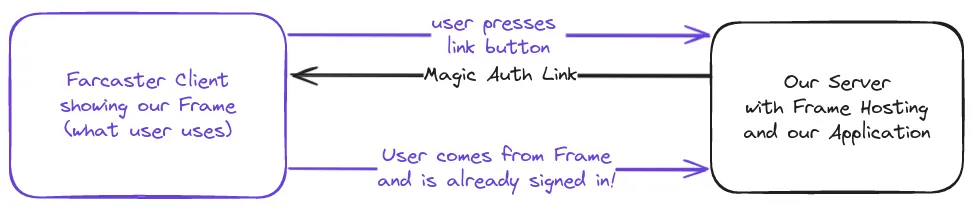
What we want to build is a Frame that contains a link. When the user clicks that button and is linked to our webpage we want to know that the user is real and log them in.
If we already have user data on them we can easily use that as well as we will know who is logging in. But how is it done? We are using the Farcaster Clients that will actually query our server for the link! That way we can show unique links to each user!
Well okay so why does it need to be unique and why is it secure?
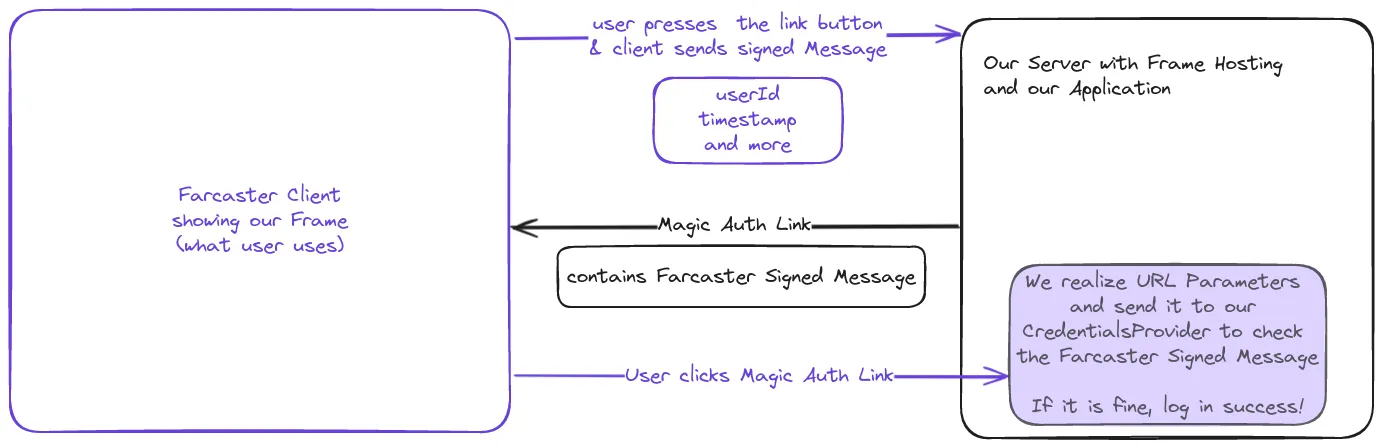
We need unique links because if the link is the same how can we know what user it is? We are not able to set cookies as the user will not visit the webpage before clicking the link to the webpage. We need to have the data in the link! We can use URL parameters for that!
And security? well each Farcaster client has a Signer. That means they can sign cryptographically which demonstrates that the user is actually the user! Okay and that helps us? Yes because we can verify that signature and if it matches the user, we know it is them accessing the page and log them in.
It is like sending a password reset link to a user that will log them in to reset the password. Just that we use the authenticity and security of Farcaster Signers and don’t need to setup anything ourselves besides validation! How cool is that? We also know each user is unique since each has their own FID (userId).
So how do we get it done?
Add a Custom Credentials Provider
In NextAuth to login users we need Authentication Providers and we will use Credential Providers we create on ourselves that only takes the Farcaster Signed Message we recieve from the Farcaster client when the user clicks the button in the Frame.
To get it done we need to be able to verify that the signedMessage we get in the Magic Link is valid. That is a NextAuth Specific part and you can use the same logic we are building now for any authentication provider to login users from Farcaster Frames.
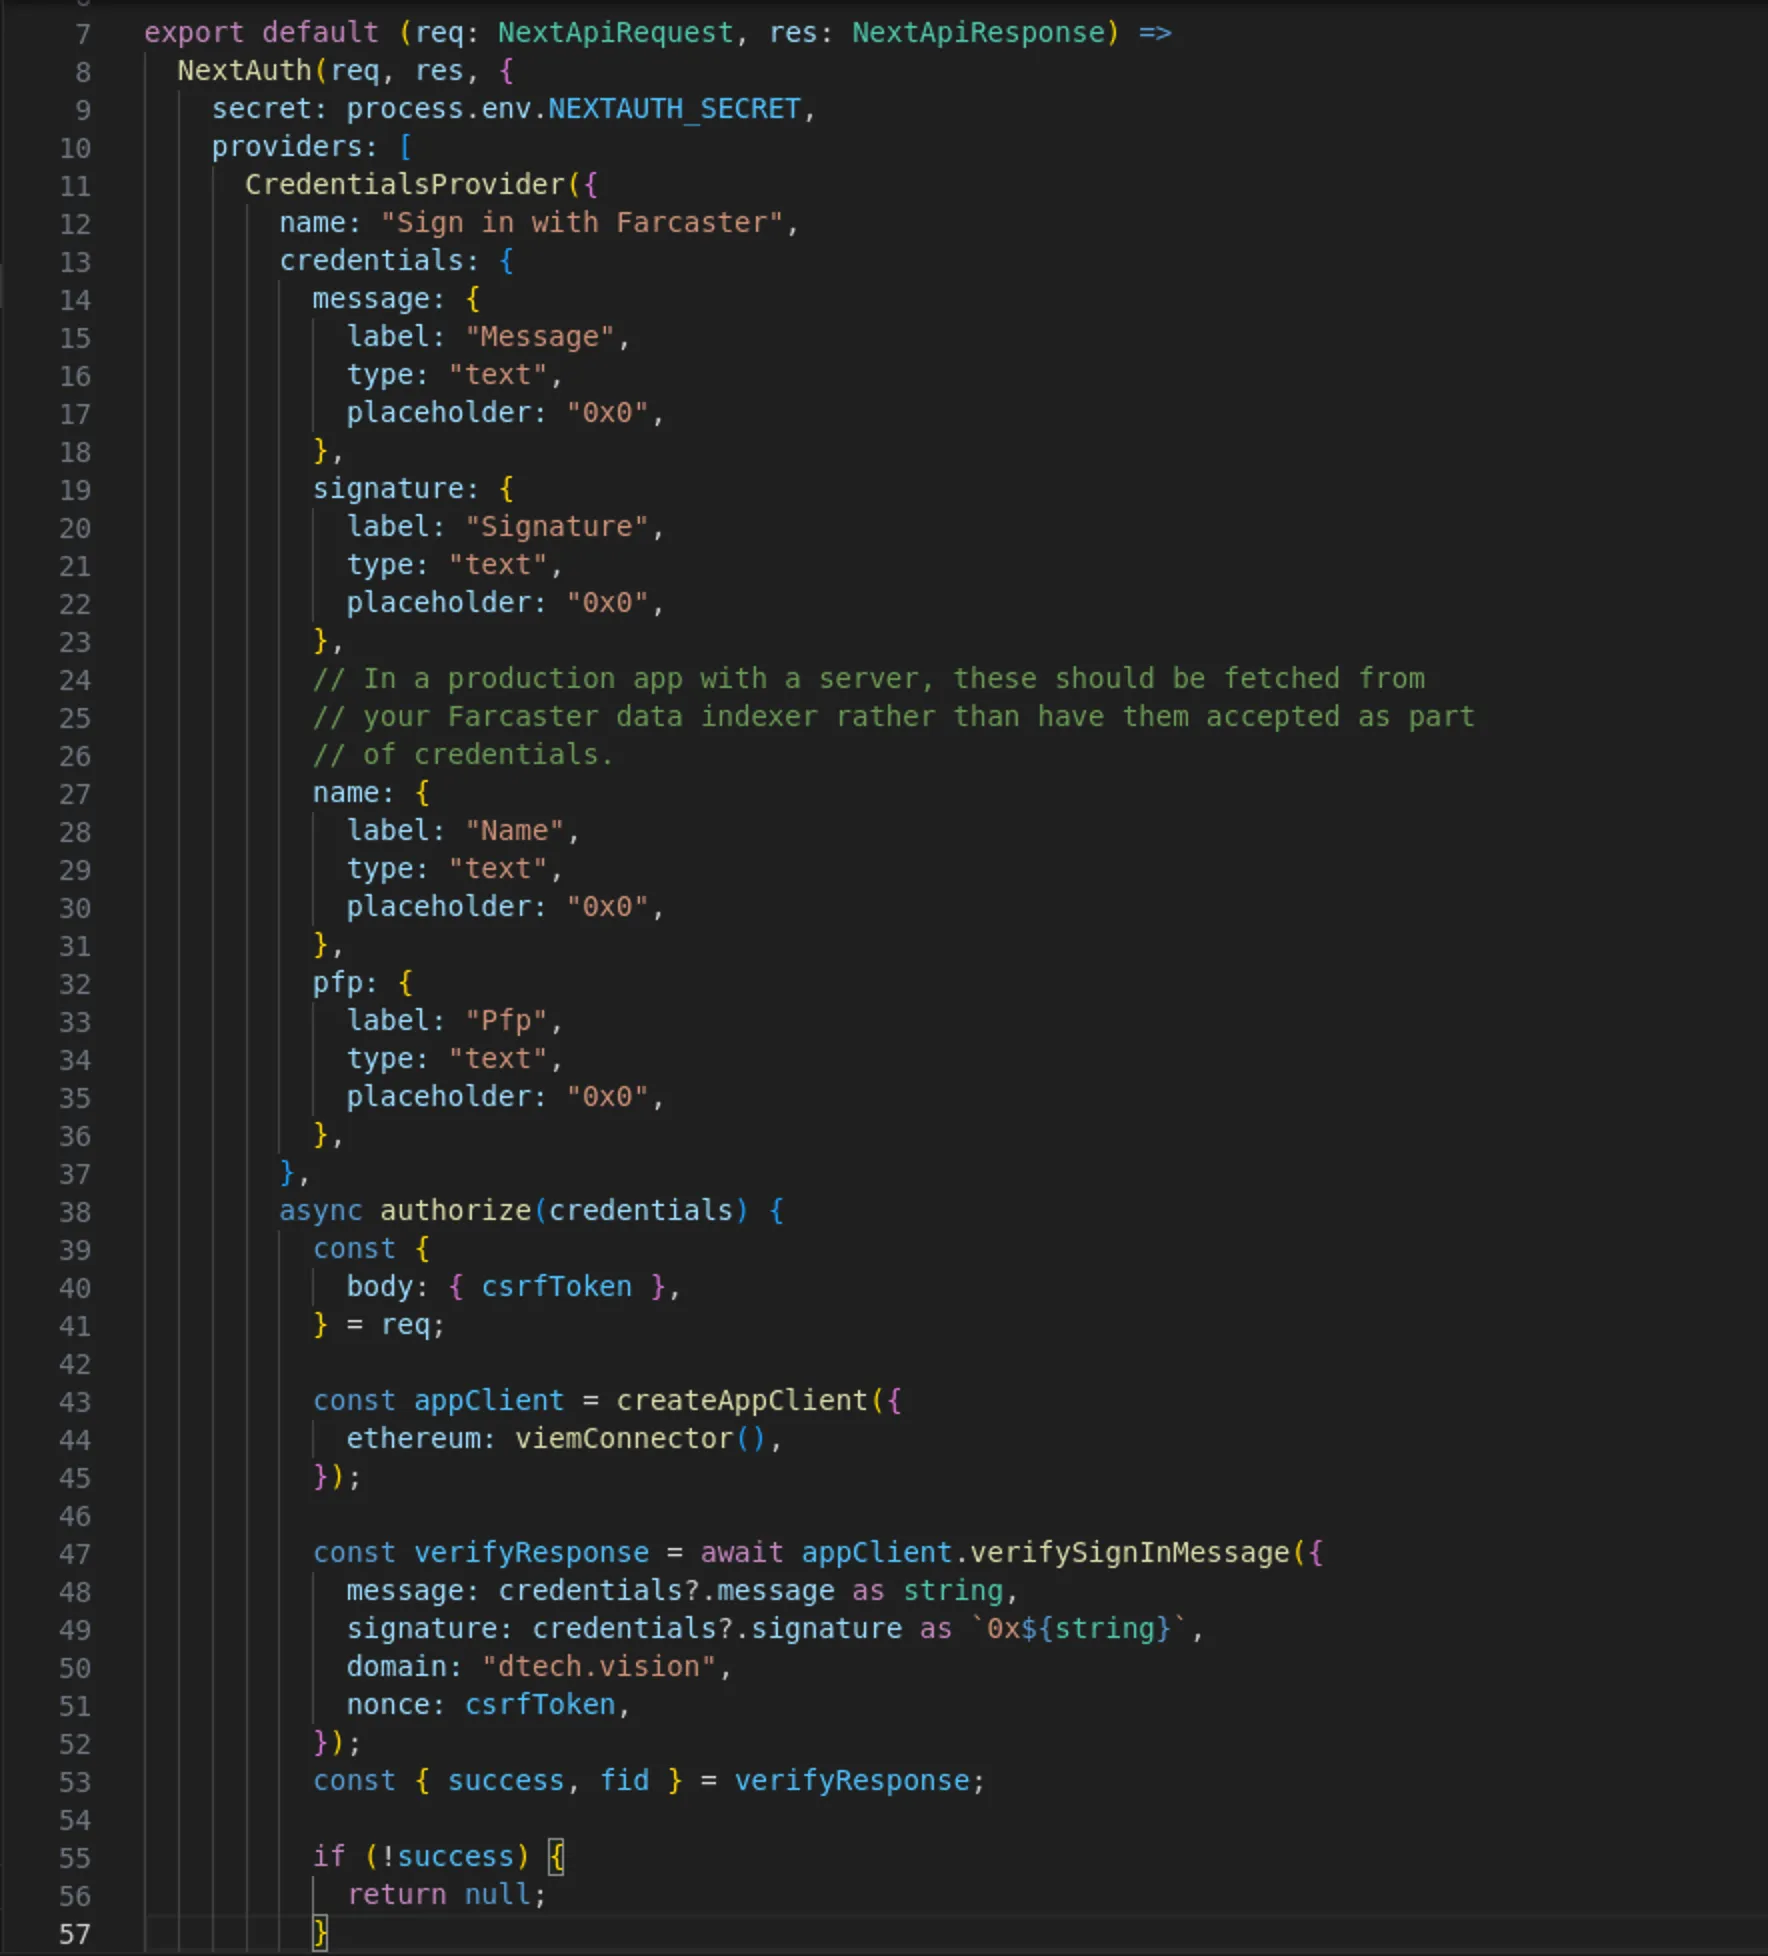
In NextAuth we have our authentification specific code in pages/api/auth/[...nextauth].ts where all our configuration for authentification lives.
We can see that our login via Farcaster in the Quickstart worked because there already is a CredentialsProvider called “Sign in with Farcaster”. This is exactly what we did and what logged us in. Feel free to check the code as what we are building is really similar just that we will not verify SIWF messages, but the signedMessageBytes from a Farcaster Frame.
Start by creating a new CredentialsProvider and give it the id farcasterframe. We will need this id to tell our authentication backend what provider we want to sign the user in with later. We will also give our Credentials Provider a name.
// sign in with Farcaster Frame // used with link like: `https://dtech.vision/?signedmessagebytes=${signedmessagebytes}` CredentialsProvider({ id: 'farcasterframe', name: 'Sign in with Farcaster Frame Message', }),Now we have our CredentialsProvider setup, but it doesn’t know what to login with so we need to tell it that we are passing a credential of type text that is called signedMessageBytes which we name it to match what Farcaster gives us.
// sign in with Farcaster Frame // used with link like: `https://dtech.vision/?signedmessagebytes=${signedmessagebytes}` CredentialsProvider({ id: 'farcasterframe', name: 'Sign in with Farcaster Frame Message', credentials: { signedmessagebytes: { label: "Farcaster Signed Message Bytes", type: "text" }, }, }),We are able to pass the signedmessagebytes from the Farcaster Frame to our Backend which handles authentification now.
But that is not enough. Simply passing the signed Message doesn’t mean we verified it and doesn’t log the user in. So we need to tell our Backend how to do that.
We can override the authorize method of our CredentialsProvider and implement our custom authentification logic there.
CAREFUL You are now handling Authentication. If you screw up you will have unauthorized access, attack vectors or users not being able to log in. Check twice and talk to others to check that what you are doing really is secure and makes sense. Test the intended flow and edge cases!
To validate the signedMessage we need validate the Frame Action against a Farcaster Hub.
You could use any Hub out there to do it or you can use an API Provider like Neynar that does it for you so you don’t need to run Hubs yourself.
What is going to happen? We will send the signedmessagebytes out and get a validation response that tells us if it is valid and what the signed data is.
The signed data format can be viewed in the Farcaster Specification and contains important information like the userId (FID) of the interacting user as well as a timestamp of when the message was signed (meaning when the interaction happened). When looking at the specification of the Frame Signature Packet you will see that the untrustedData is the data format contained in the signed message.
Nice bro, but how to do auth? Simply use the Neynar API, verify the signature and return a user object if successful.
Code? Here is our authorize function that we override and takes in the credentials we defined above.
To install the Neynar SDK we run npm install @neynar/nodejs-sdk and
add the import of the NeynarAPIClient at the top import { NeynarAPIClient } from "@neynar/nodejs-sdk";.
Now we are ready to send the signedMessageBytes off and get the result back.
      // sign in with Farcaster Frame      // used with link like: `https://dtech.vision/?signedmessagebytes=${signedmessagebytes}`      CredentialsProvider({        id: 'farcasterframe',        name: 'Sign in with Farcaster Frame Message',        credentials: {          signedmessagebytes: { label: "Farcaster Signed Message Bytes", type: "text" },        },        authorize: async (credentials) => {          try{            const neynar = new NeynarAPIClient(process.env.NEYNAR_API_KEY!!);            const response = await neynar.validateFrameAction(              credentials?.signedmessagebytes as string,              {                castReactionContext: false,                followContext: false,                signerContext: false              }            );
            // shorten response types from Neynar (https://docs.neynar.com/reference/validate-frame)            const action = response.action;            const interactor = action?.interactor;
            return {              id: interactor?.fid.toString(),              name: interactor?.username,              image: interactor?.pfp_url,            };          } catch (error) {            console.error(`Error in authorize farcasterframe: ${error}`);            return null;          }        },      }),
What we do here is return the same information that the Sign in with Farcaster CredentialsProvider does to stay compliant with the sample. You may and likely want to adjust this to your customer user type. It makes sense to use Farcaster ID’s as a unique mapping from FID < > User in your application. Do not use the username (fname e.g. samuellhuber) as a user can change that but will never change their FID.
Also be reminded that with the above setup one could replay the signedMessage and be signed in. We will discuss security in a dedicated section.
Now that we have a method to log users in we need to generate the authentication links, add them to our Frames and then handle the login in the Frontend.
Add a Frames Endpoint to generate Authentication Links
What is a Frames Endpoint? Simply anything that handles a POST request and returns something according to the Frames Specification. In our case we want to recieve Frame Action with it’s signedMessageBytes and return a redirect link.
Important Make sure to return 302! Do not use .redirect() in NextJS as that will override the Status Code to 307 or 308 but we need 302!
So what we will do is create a POST request handler and return our redirect link. The scaffolding of that we will create under our auth API directory and call the route createAuthLink.
pages/api/auth/createAuthLink.ts
import { NextApiRequest, NextApiResponse } from 'next';
export default async function handler ( req: NextApiRequest, res: NextApiResponse ) {    if(req.method !== "POST") {        res.status(405).json({ error: "Method not allowed" });    }
    try {        // handle post    } catch (error) {        // handle error    }}
What we need to be mindful of here is that our Frame will expect a response in any case! Meaning if our computation throws an error we absolutely need to make sure we still return a redirect! Else the user will not get a link and think our Frame is broken.
I’d much rather have the user login on the webpage manually then not have them at the webpage at all. Best of course is sign them in which reduces friction.
Okay so what do we do? You already know! We’ll use the FrameAction and create a link that has the signedMessageBytes as URL Parameters.
Why that? Doesn’t that mean they are public? Yes. Also following Kerkhoffs Principle any security system should be secure if the mechanism is public.
No issue there, we will add defence against replay attacks reusing the signedMessageBytes from the link in the security section.
the logic to handle the post will extract the signedMessage byte and any user input as well. Input is useful if you frame has input enabling you to add context to each action. You could also have the different buttons mean different pages on the webpage like Settings, Homescreen or a Profile.
That custom return could also be handled here by running a case distinction (if statements) over the button index used. For details check the Quickstart with Farcaster Frames Tutorial.
Let’s handle the error case first. In this case we’ll just link to our webpage (Home). Guaranteeing that the user will always land on our page!
try { // handle post } catch (error) { console.error(`Error in createAuthLink: ${error}`) res.writeHead(302, { Location: `${process.env.NEXTAUTH_URL}/` }); res.end(); }Notice the explicit use of writeHead(302, ...) to guarantee the status code of our response is a 302 redirect!
We are using the NEXTAUTH_URL as a Location since we will need that set in our environment variables anyway to make NEXTAUTH work properly!
Lets return a URL that contains our signedmessagebytes and potential user input as link to the user!
For that we will simply take what is sent and not do verification. Why? Because verification happens at the auth level anyway. No need to redo, we can’t persist that login here anyway since it’s a simple API request and we can’t set session cookies in the user’s browser.
    if(req.method !== "POST") {        res.status(405).json({ error: "Method not allowed" });    }
    try {        const frameRequest = req.body as FrameRequest;        const input = frameRequest.untrustedData.inputText;        const signedmessagebytes =  frameRequest.trustedData.messageBytes;
        res.writeHead(302, {            Location: `${process.env.NEXTAUTH_URL}/?input=${input}&signedmessagebytes=${signedmessagebytes}`        });        res.end();    } catch (error) {        console.error(`Error in createAuthLink: ${error}`)        res.writeHead(302, {            Location: `${process.env.NEXTAUTH_URL}/`        });        res.end();    }
Our handler now return a 302 redirect in all cases and has input and signedmessagebytes in the successful case, while logging errors and just redirecting to the mainpage otherwise.
If you would love the types check the types in Coinbase OnchainKit.
So now we are able to return a URL to our user!
We just need to build a frame that calls our endpoint and handle the URL parameters for signin on the application side.
Build our Frame to Link to the Webpage with SignIn
The Frame building is easy. We only need one button that pings our server so we can return the link and the user gets prompted to go there.
Read and work through the Quickstart with Farcaster Frames Tutorial if you want to learn how to build more complex Frames and learn how Farcaster Frames work in general.
In our pages/index.tsx we are returning some HTML via the JSX and can add our Frame there, remember Frames are just HTML Metadata.
and what we want is the Farcaster Client to send a POST request to our Server so we respond with a 302 redirect and location to go to. This can be done by making a post_redirect action button.
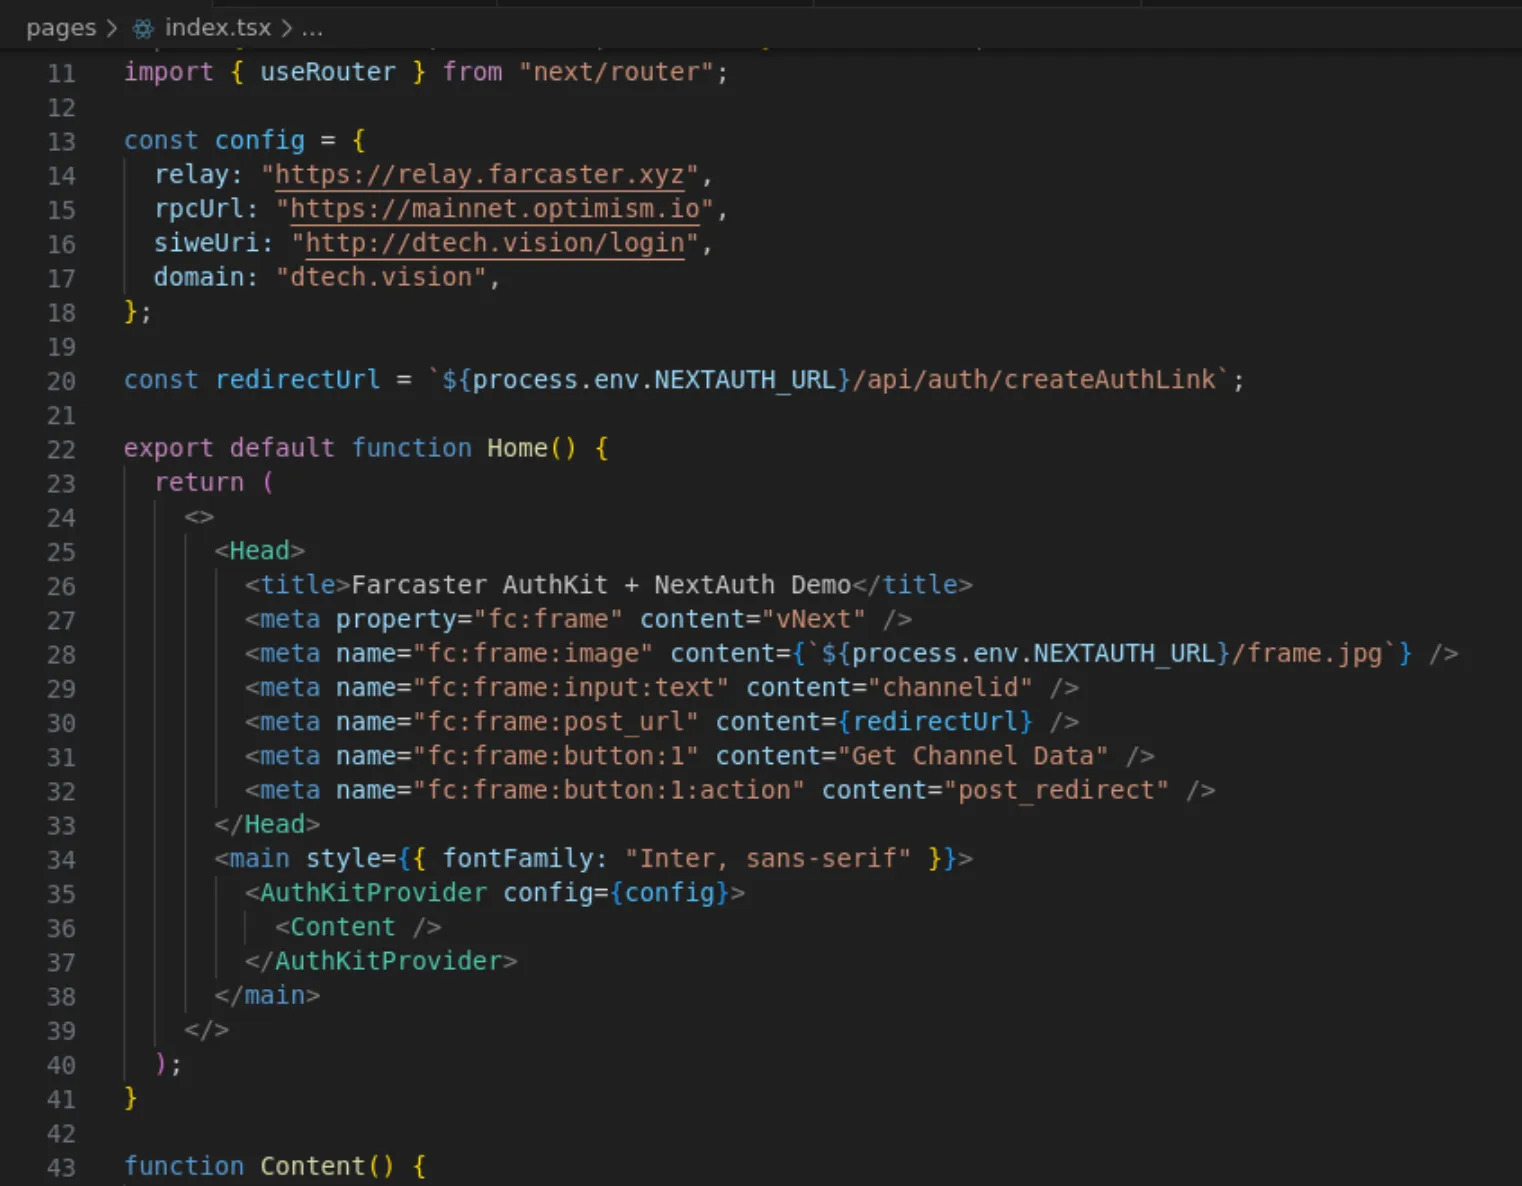
So we set fc:frame as metadata because that says we build a frame. Then we also set an image and a text input with placeholder channelid because we want to get user input too.
Then we build our button. post_url will be the URL we set so ${process.env.NEXTAUTH_URL}/api/auth/createAuthLink which I stored in a redirectUrl variable.
After specifying that we set the button text/label (content) and tell the button what it is via the action tag, namely a ‘post_redirect’.
pages/index.tsx
export default function Home() { return ( <> <Head> <title>Farcaster AuthKit + NextAuth Demo</title> <meta property="fc:frame" content="vNext" /> <meta name="fc:frame:image" content={`${process.env.NEXTAUTH_URL}/frame.jpg`} /> <meta name="fc:frame:input:text" content="channelid" /> <meta name="fc:frame:post_url" content={redirectUrl} /> <meta name="fc:frame:button:1" content="Get Channel Data" /> <meta name="fc:frame:button:1:action" content="post_redirect" /> </Head> <main style={{ fontFamily: "Inter, sans-serif" }}> <AuthKitProvider config={config}> <Content /> </AuthKitProvider> </main> </> );}For the image I used a jpg that I called frame.jpg and placed in the public/ folder. You can use any image that is 1.91:1 aspect ratio or 1:1 aspect ratio as that is what will be rendered and if you do 1:1 set the aspect ratio parameter.
<meta name="fc:frame:image:aspect_ratio" content="1:1" />So our index.tsx now defines the Frame, some content we show which we can leave as is to our sample rendering the top right profile component once logged in and some text.
Handle Login on our Webpage
Now we created a Frame that we can use to get the login link with we need to handle the login on the webpage as well.
How do we do? We check for the URL parameters and then just try to log the user in.
To handle the signIn luckily we can use the provided React Hooks to SignIn.
If we just hijack the Profile component we can do it all there. To check existance of any url parameter (input and signedmessagebytes) we can use the included Router.
  const router = useRouter();
  useEffect(() => {    // if one uses a one click login link via farcaster frame -> sign in    if (router.query.signedmessagebytes) {        console.log('signedmessagebytes found!');    }  }, [router]);
Why is there that weird [router] after our function? ask react devs. Thank you. From the types it is the dependency list meaning that if anything in that list changes the effect will be executed.
Since we check for existence of our signedmessagebytes query parameter that we set in the createAuthLink API route we use to get it to the user, we know it’s present if the user wants to login.
It could also be present if someone replays the login, but we’ll discuss security here.
For now let’s actually use the sign in hook to sign a user in.
  const router = useRouter();
  useEffect(() => {    // if one uses a one click login link via farcaster frame -> sign in    if (router.query.signedmessagebytes) {        signIn("farcasterframe", { signedmessagebytes, redirect: false });    }  }, [router, signIn]);
What we are now doing is using the provided signIn Hook to call our auth backend and sign a user in using our custom CredentialsProvider. This is why we set the id to farcasterframe.
Because now we can tell it to specifically use the one we want. We are passing the signedmessagebytes and like we programmed before the user is logged in if the signed data is valid.
Why redirect false? Well if we redirect the default is to redirect to the same page and then the query parameters (url/?signedmessagebytes=…) still exist so we are looping.
We can also handle that by creating custom redirect links or removing the url parameters after use.
Let’s reset the url parameters once we used them and also add some error handling.
  const router = useRouter();
  useEffect(() => {    // if one uses a one click login link via farcaster frame -> sign in    if (router.query.signedmessagebytes) {      const signedmessagebytes = router.query.signedmessagebytes as string;      if (signedmessagebytes) {        try {          // redirect is set to false to leave us on current page vs being looped around          signIn("farcasterframe", { signedmessagebytes, redirect: false });          router.replace(router.pathname, undefined, { shallow: true });        } catch (error) {          console.error("Failed to sign in with Farcaster Frame");        }      }    }  }, [router.query.signedmessagebytes, session, router]);
Let’s also handle our input and make sure that there is an input variable able to be used by our frontend that we set if it’s available. Note that this input parameter may not be 100% authentic.
  const router = useRouter();  const [input, setInput] = useState("");
  useEffect(() => {    // if one uses a one click login link via farcaster frame -> sign in    if (router.query.signedmessagebytes) {      const signedmessagebytes = router.query.signedmessagebytes as string;      if (router.query.input) setInput(router.query.input as string);      if (signedmessagebytes) {        try {          // redirect is set to false to leave us on current page vs being looped around          signIn("farcasterframe", { signedmessagebytes, redirect: false });          router.replace(router.pathname, undefined, { shallow: true });        } catch (error) {          console.error("Failed to sign in with Farcaster Frame");        }      }    }  }, [router.query.signedmessagebytes, signIn, session, router]);
Now you have signed in a user from a Farcaster frame. You can try it by pinging your example with a local debugger or the warpcast tool. For more on Frames check the quickstart.
Security and other considerations for Authentication
With what we have so far on our authorize() function for the CredentialsProvider we do not check when the signature was created so anyone that at somepoint managed to get a signature for a user will be logged in. We don’t want that so we can check the timestamp present in the signed data and compare it to current time.
Checking timestamps and making sure we only allow a certain time to be passed reduced the attack surface for replay attacks.
To make sure that we use the correct time (since Farcaster Time is Farcaster Epoch not Unix Timestamp), we will create a helper file and use functions from there.
export const FARCASTER_EPOCH = 1609459200000; // January 1, 2021 UTC
/** * Get the current Farcaster time. * @returns seconds since the Farcaster Epoch */export const getFarcasterTime = () => {  return toFarcasterTime(Date.now());};
/** * Converts from a Unix to Farcaster timestamp. * @param time unix milliseconds * @returns seconds since the Farcaster Epoch */export const toFarcasterTime = (time: number) => {  if (time < FARCASTER_EPOCH) {    throw Error(("bad_request.invalid_param: time must be after Farcaster epoch (01/01/2022)"));  }  const secondsSinceEpoch = Math.round((time - FARCASTER_EPOCH) / 1000);  if (secondsSinceEpoch > 2 ** 32 - 1) {    throw new Error("bad_request.invalid_param: time too far in future");  }  return secondsSinceEpoch;};
/** * Converts from a Farcaster to Unix timestamp. * @param time seconds since the Farcaster Epoch * @returns unix milliseconds */export const fromFarcasterTime = (time: number) => {  return time * 1000 + FARCASTER_EPOCH;};
These helpers allow us to convert the Frame Message timestamp to Unix time and check if the signature is expired.
            // ...            // shorten response types from Neynar (https://docs.neynar.com/reference/validate-frame)            const action = response.action;            const interactor = action?.interactor;
            const actionTimestamp = fromFarcasterTime(message.data.timestamp);
            // Farcaster timestamp is seconds since Farcaster epoch, while Date.now is milliseconds since Unix epoch            // Farcaster Epoch is Jan 1, 2021 00:00:00 UTC (unix timestamp: 1609455600) -> https://docs.farcaster.xyz/learn/what-is-farcaster/messages#timestamps            if ((actionTimestamp + (1000 * 60 * 5)) < Date.now().valueOf()) {              // don't allow messages older than 5 minutes, .valueOf() for UTC              return null;            }            // ...
The Input variable in the frame example is used from untrusted data and from URL Parameters as is. One would need to verify the signature again and extract input from it to guarantee the input is actually the input the user signed. After verification you could use the return from verification to use this input variable.
This is omitted for the sake of simplicity of the concept, but might be critical in a production system.